Okta

Configure Okta to use ID.me as a SAML identity provider.

Overview

This guide provides steps to integrate Okta with ID.me using the SAML 2.0 protocol.

Intended audience
Developers and IAM administrators responsible for configuring federation between Okta and ID.me.

What you will build
A federated authentication flow where Okta delegates user authentication to ID.me.

Result
A federated SAML authentication flow where Okta delegates authentication to ID.me.

Identity proofing behavior
Authentication behavior, identity verification settings, and returned attributes are driven by ID.me policy configurations.

Authentication flow

The following steps outline the SAML authentication flow between the user, Okta, and ID.me:

1

The user attempts to access an Okta-protected application

2

Okta redirects the user to ID.me for authentication

3

The user completes authentication and identity verification at ID.me

4

ID.me redirects the user back to Okta with a signed SAML assertion

5

Okta validates the assertion and grants the user access

Prerequisites

  • An Okta Developer Account (sign up at https://developer.okta.com/signup/)
  • Administrator access to the Okta tenant
  • An ID.me sandbox account for testing your integration
  • Understanding of SAML flows and terminology

Environments

ID.me provides two environments:

Sandbox

https://api.idmelabs.com/

Production

https://api.id.me/

All ID.me OIDC and SAML endpoints are derived from the base URL above. For production, replace the sandbox base URL in every ID.me endpoint you configure.

Examples

  • OIDC issuer (Sandbox): https://api.idmelabs.com/oidc
  • OIDC issuer (Production): https://api.id.me/oidc
  • SAML metadata URL (Sandbox): https://api.idmelabs.com/saml/metadata
  • SAML metadata URL (Production): https://api.id.me/saml/metadata

Configure Okta

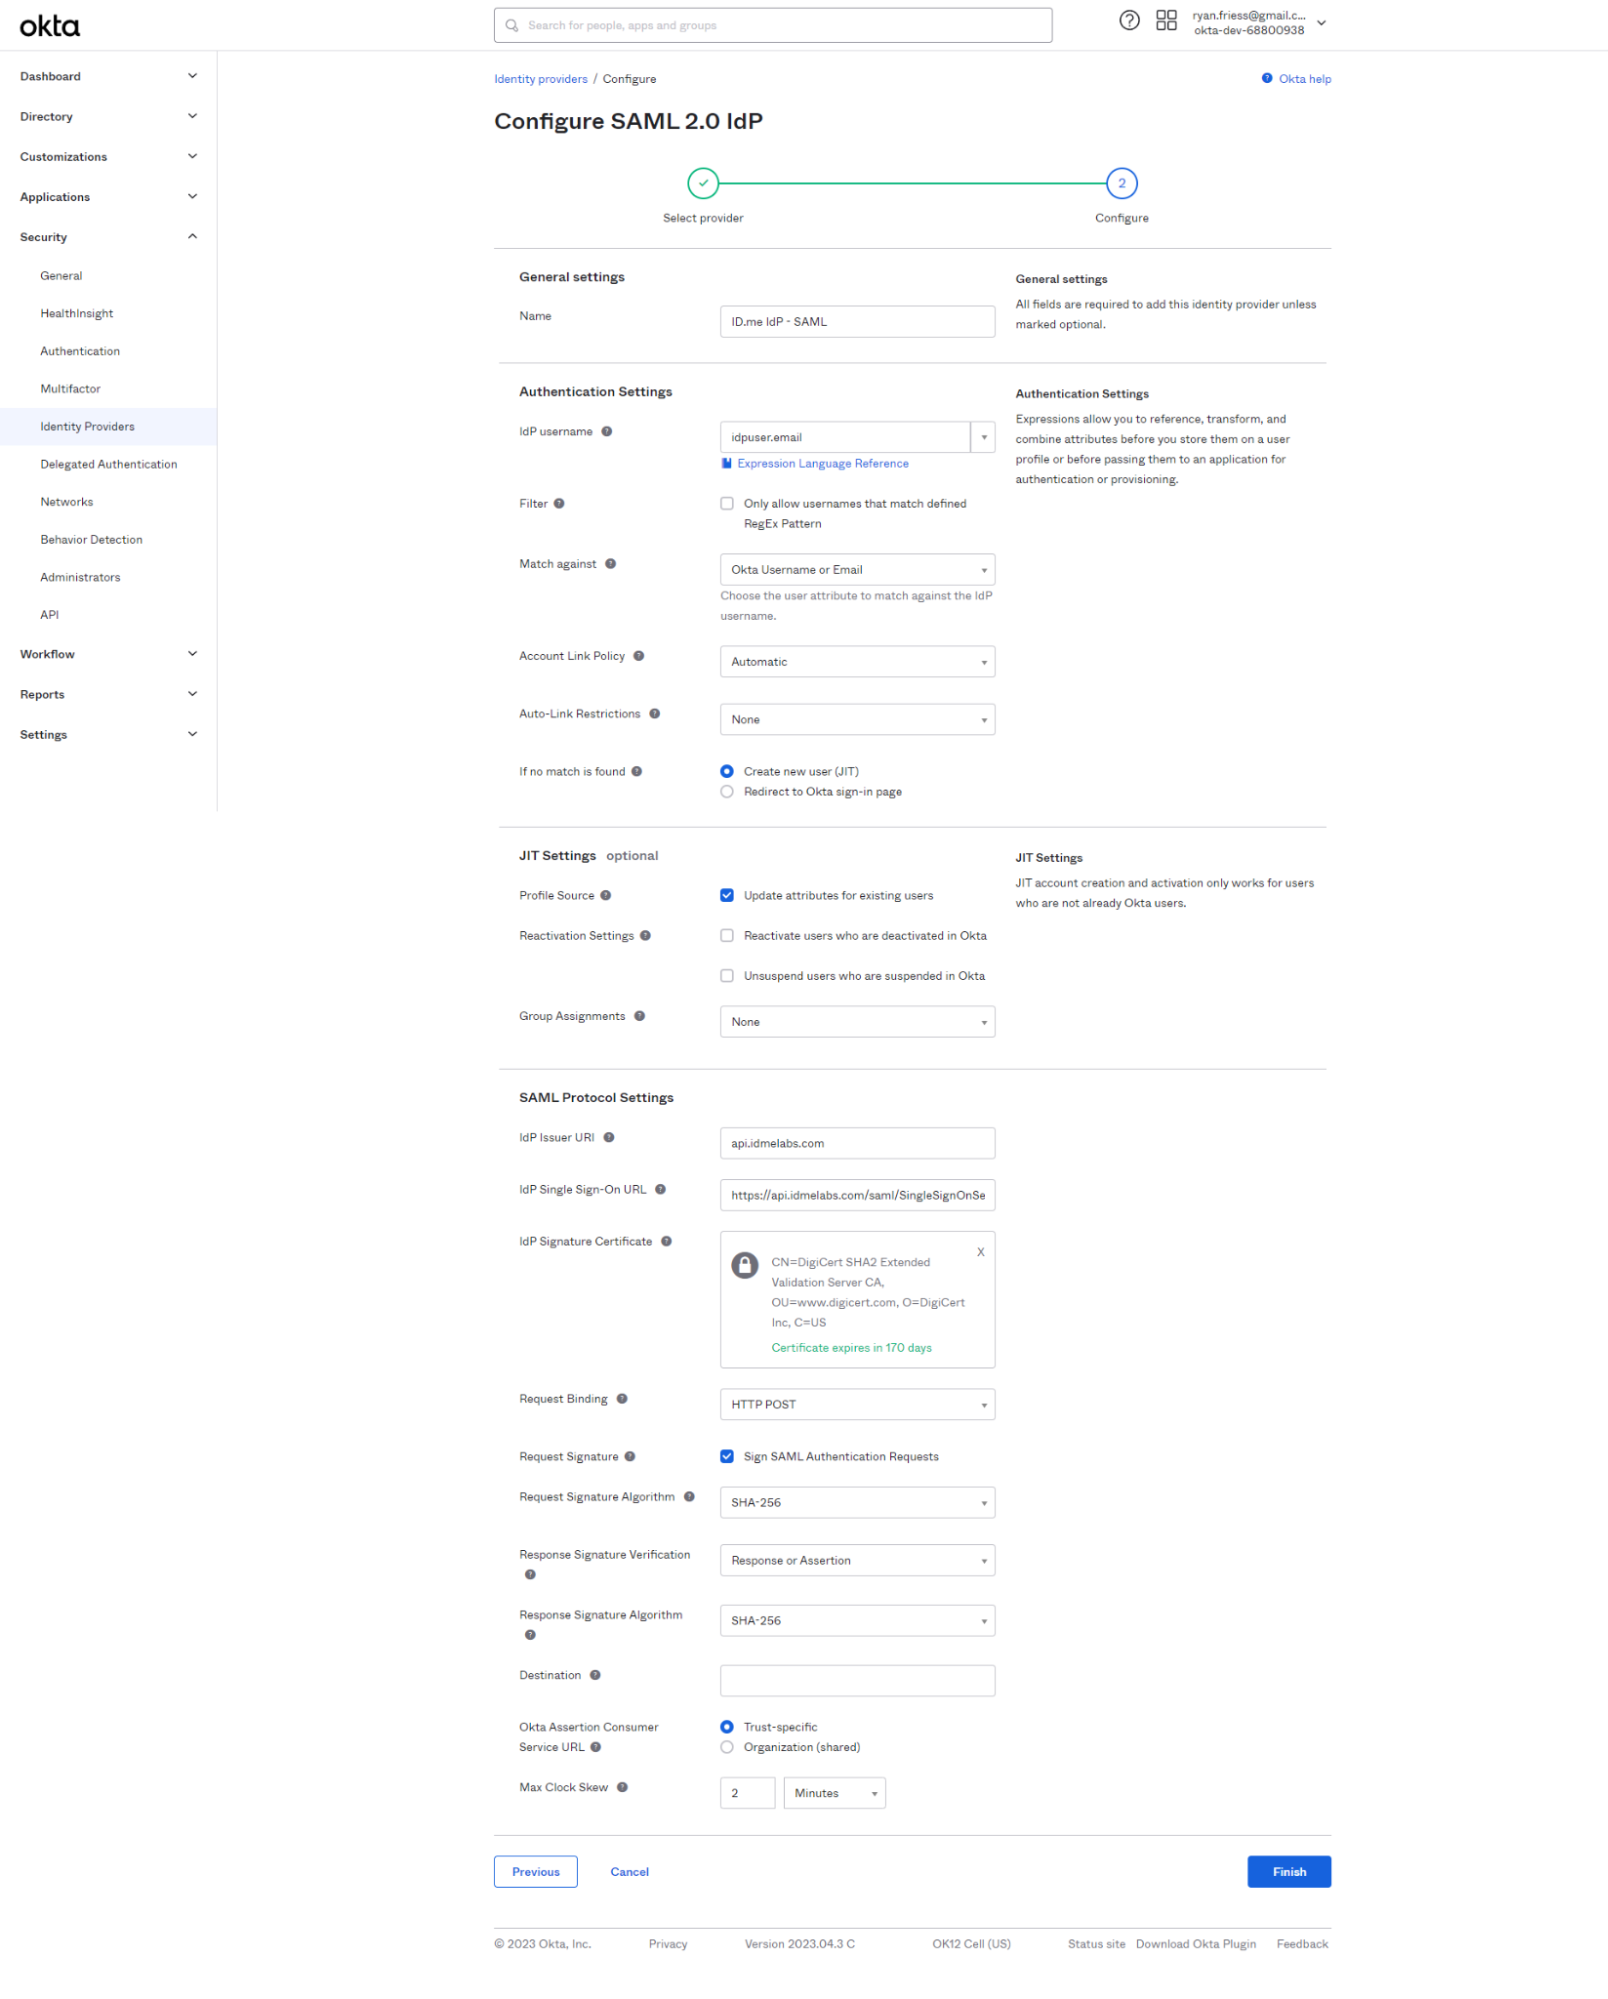
Create an Identity Provider

1

Log in to your Okta Developer Account

2

Navigate to Security > Identity Providers

3

Select Add Identity Provider

4

Select SAML 2.0 IdP and select Next

5

Configure the General Settings:

  • Name: ID.me IdP - SAML
  • IdP Usage: SSO (Single Sign-On)
6

Configure the User Matches:

  • IdP Username: idpuser.email
  • Match against: Okta Username or Email
  • Account Link Policy: Automatic
7

Configure the JIT Settings:

  • If no match is found: Create New User (JIT)
  • Profile Source: Update attributes for existing users
8

Configure the SAML Protocol Settings:

To obtain the ID.me Signing Certificate, download the metadata from https://api.idmelabs.com/saml/metadata/provider. Copy the X.509 certificate between the ds:X509Certificate tags. You may need to format it as a PEM file with standard headers using a tool like SAMLTool.

FieldValue
IdP Issuer URIapi.idmelabs.com
IdP Single Sign-On URLhttps://api.idmelabs.com/saml/SingleSignOnService?AuthnContext=http://idmanagement.gov/ns/assurance/ial/2/aal/2
IdP Signature CertificateUpload the formatted ID.me X.509 certificate
Request BindingHTTP Post
Sign SAML Authentication RequestsEnabled (Checked)
Response & Request Signature VerificationSHA-256
Destinationhttps://api.idmelabs.com/saml/SingleSignOnService?AuthnContext=http://idmanagement.gov/ns/assurance/ial/2/aal/2

Screenshot of step 2 of the "Configure SAML 2.0 IdP" page in Okta, showing General Settings with the name "ID.me IdP - SAML," Authentication Settings configured to match on Okta Username or Email with auto-linking and JIT user creation enabled, and SAML Protocol Settings populated with ID.me's Issuer URI, Single Sign-On URL, DigiCert signature certificate, and SHA-256 signing settings.

9

Select Finish

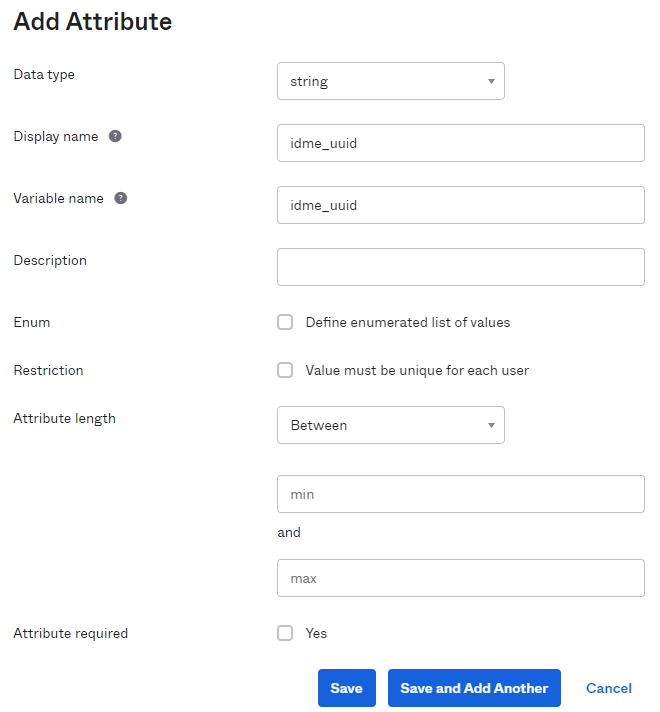
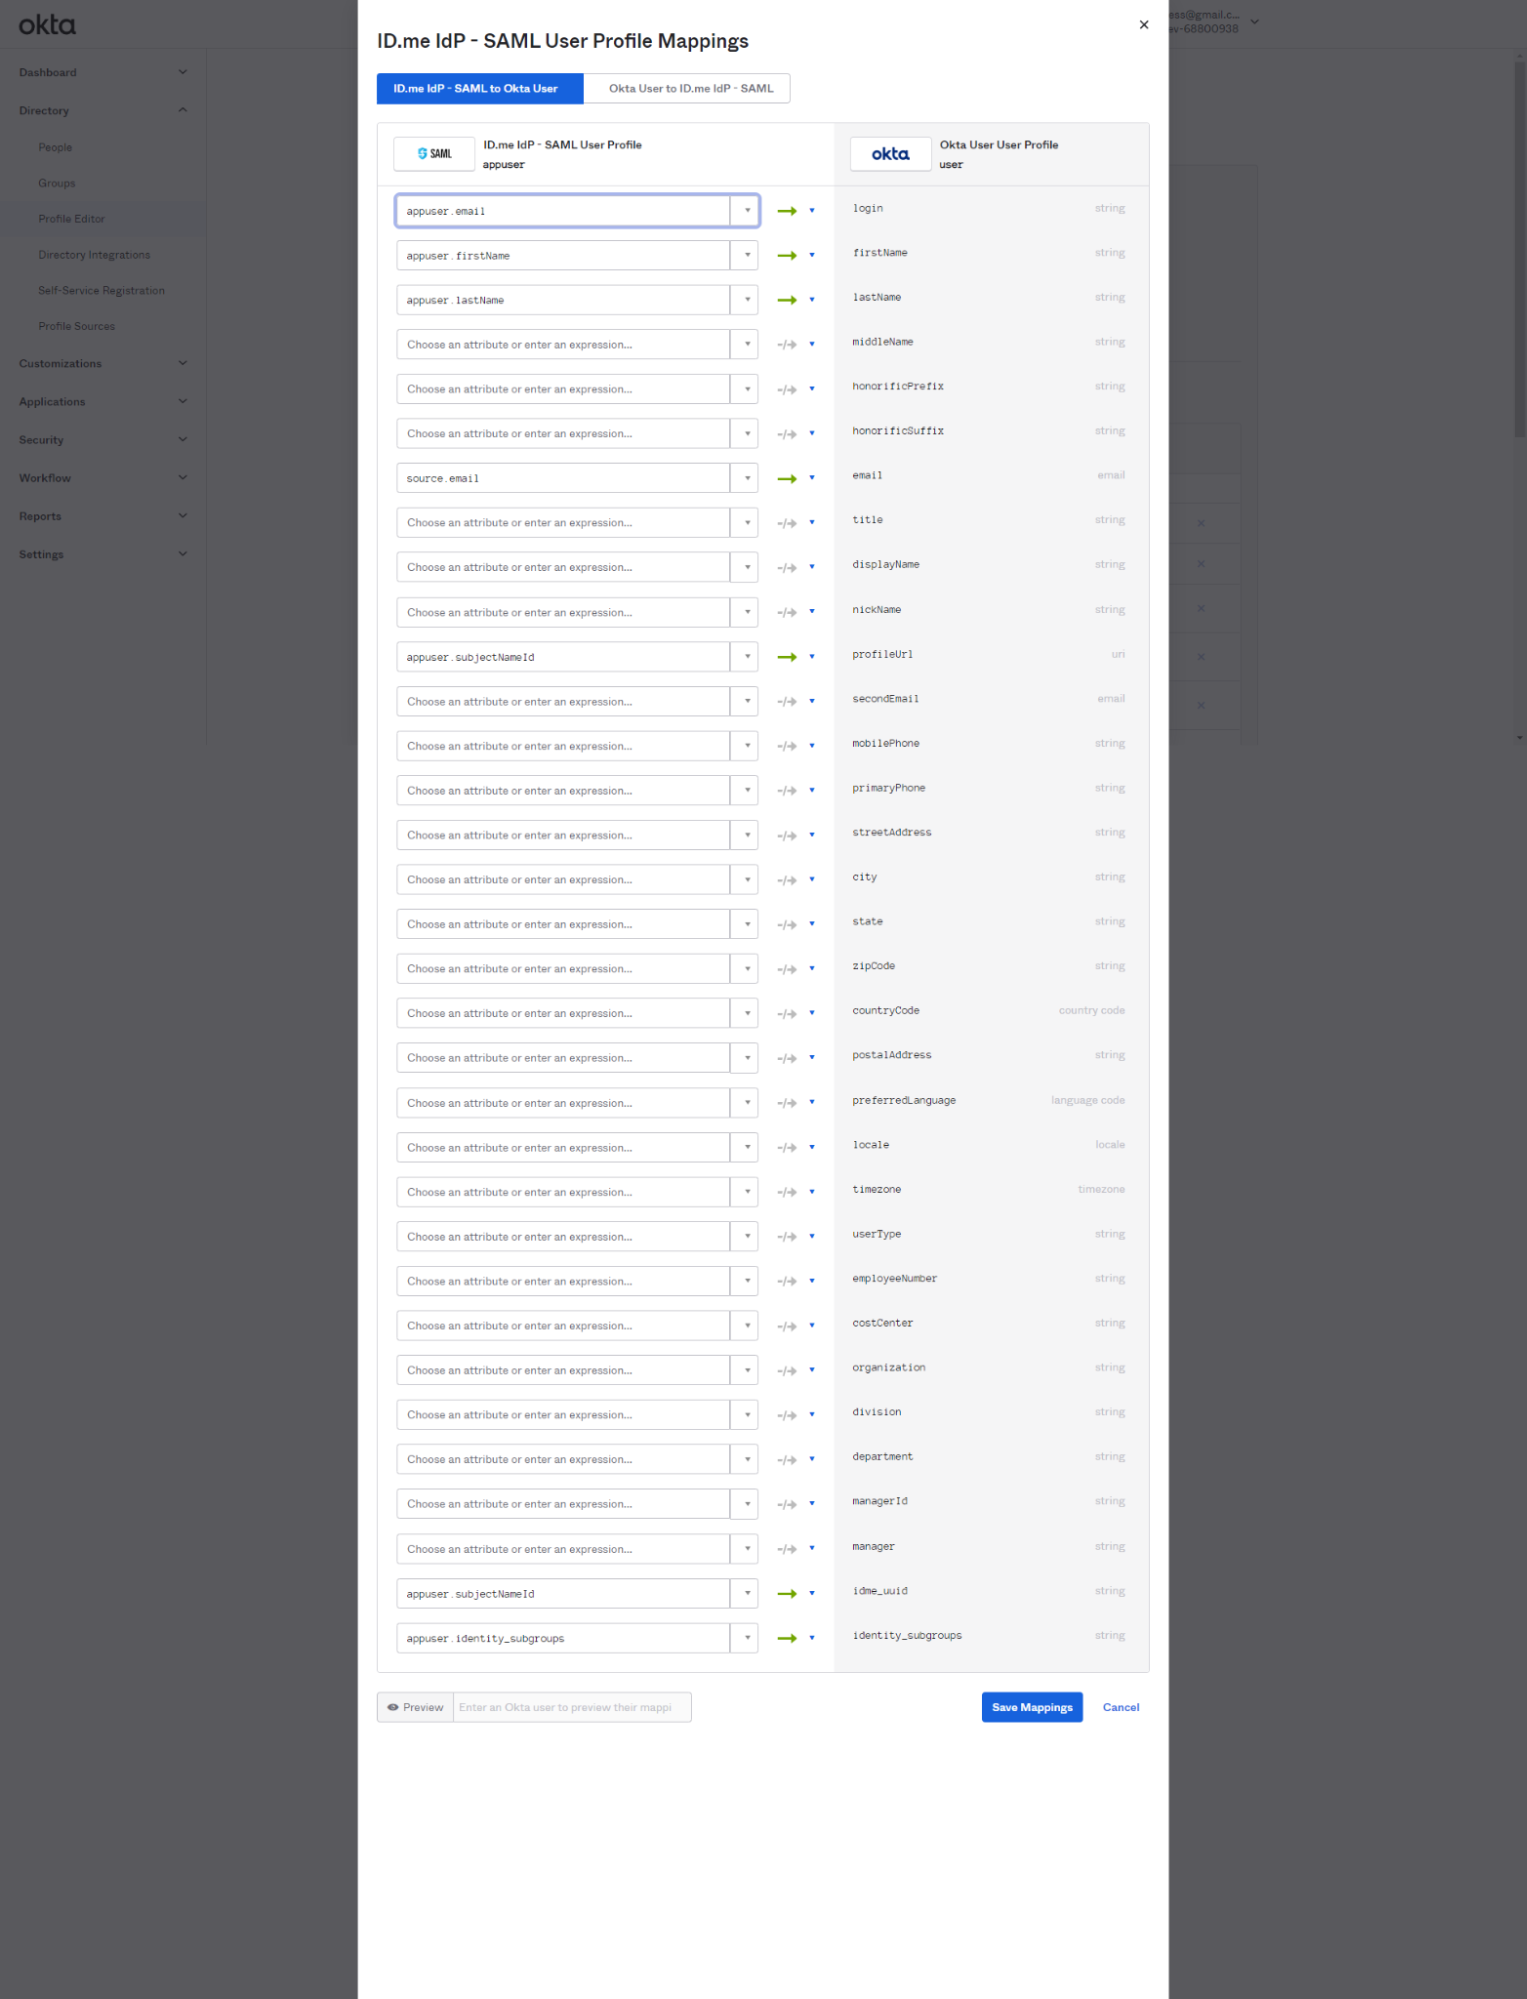
Configure attribute mappings

1

Navigate to Directory > Profile Editor

2

Select Okta User (default)

3

Select + Add Attribute to add ID.me attributes to the Okta profile

Screenshot of the "Add Attribute" form in Okta, configured to add a custom string attribute named "idme_uuid" with no description, enum, or uniqueness restrictions, attribute length set to Between with no min/max values, and the attribute not marked as required.

4

Navigate back to Security > Identity Providers

5

Select Edit Profile and Mappings for your ID.me SAML configuration

6

Map the ID.me attributes (left side) to the Okta User attributes (right side) as required for your application

Screenshot of the "ID.me IdP - SAML User Profile Mappings" dialog in Okta, showing the "ID.me IdP - SAML to Okta User" tab with mappings from ID.me SAML attributes (appuser.email, appuser.firstName, appuser.lastName, source.email, appuser.subjectNameId, and appuser.identity_subgroups) to corresponding Okta user profile fields including login, firstName, lastName, email, idme_uuid, and identity_subgroups.

7

Select Save Mappings and Apply updates now

Configure ID.me

This portion of the configuration is completed by an ID.me Solution Consultant. You will need to provide the following information to complete the setup:

Okta Metadata

Provide the metadata file from your Okta Identity Provider configuration. You can download this by navigating to Security > Identity Providers, expanding the ID.me IdP - SAML actions, and selecting Download metadata.

Okta Audience URI

The Entity ID for your Okta tenant.

Assertion Consumer Service (ACS) URL

The URL where ID.me should send the SAML response.

Signing/Encryption Certificate

The X.509 certificate from your Okta metadata, used for verifying signatures and encrypting assertions.

Test the integration

1

Navigate to Security > Identity Providers > Routing Rules

2

Select Add Routing Rule

3

Enter a Name (e.g., ID.me IdP - Okta App Portal)

4

For Use this identity provider, select ID.me IdP - SAML

5

Select Create Rule and Activate

This configuration will require all users to sign in via ID.me when accessing your Okta tenant. You can configure rules to apply only to specific applications, groups, or users if preferred.

6

Open an incognito window and navigate to your Okta App Portal URL (e.g., https://dev-12345678.okta.com)

7

Verify you are redirected to ID.me

8

Sign in or create a new ID.me account and consent to share attributes

9

Verify you are redirected back to Okta and signed in successfully

10

Navigate to Directory > People in the Okta admin dashboard to confirm the user account was created or updated with the expected attributes