PingOne OIDC integration guide

Overview

This guide provides steps to integrate PingOne with ID.me using the OpenID Connect (OIDC) protocol.

Intended audience
Developers and IAM administrators responsible for configuring federation between PingOne and ID.me.

What you will build
A federated authentication flow where PingOne delegates user authentication to ID.me.

Result
A federated OIDC authentication flow where PingOne delegates authentication to ID.me.

Identity proofing behavior
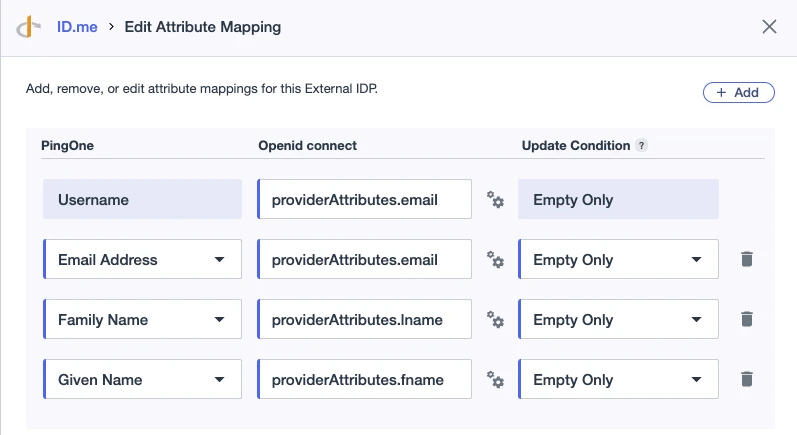
ID.me policy configurations drive authentication behavior, identity verification settings, and returned attributes.
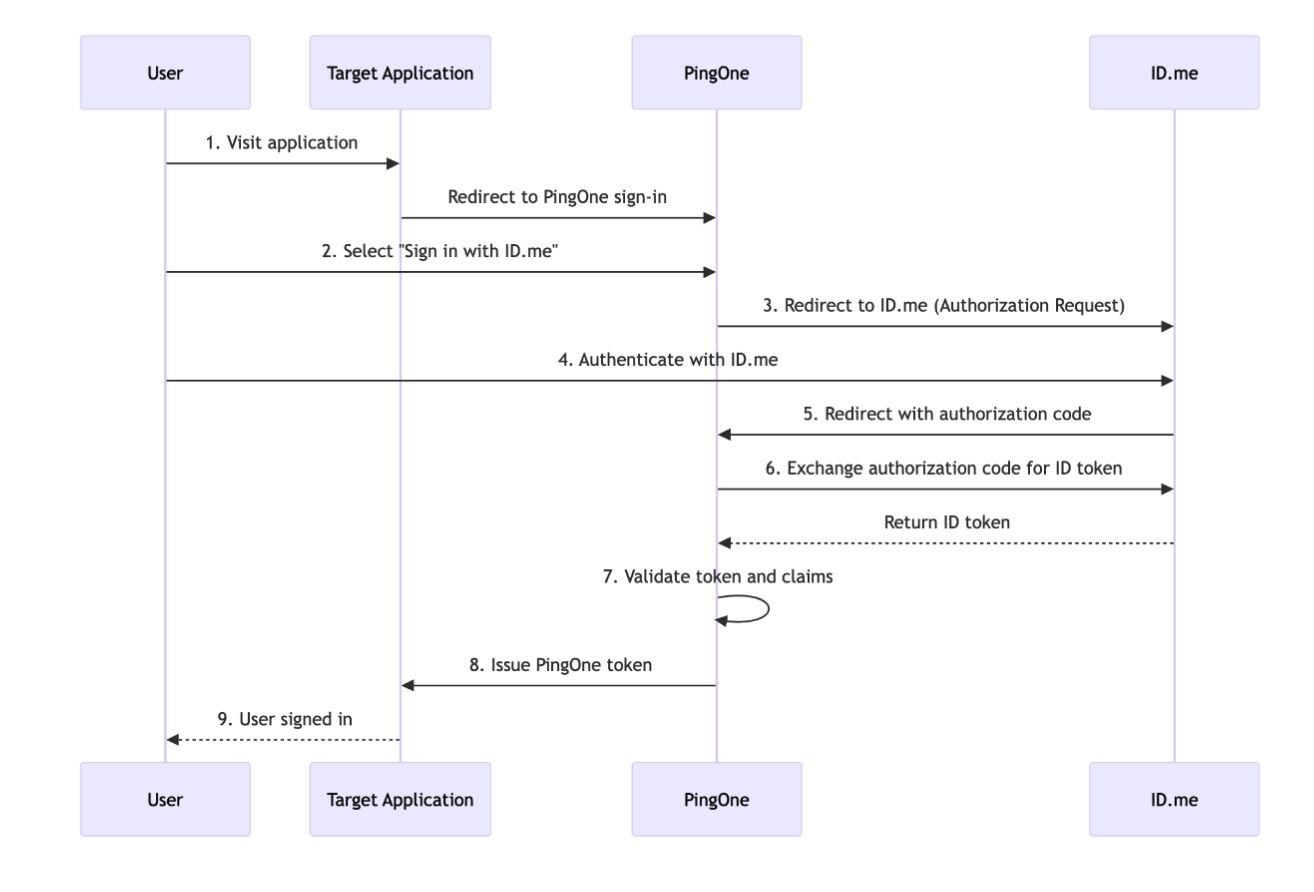
Authentication flow

The following steps outline the OIDC authentication flow between the user, PingOne, and ID.me:

1

The user navigates to the application and is redirected to PingOne

2

PingOne redirects the user to ID.me

3

The user completes authentication and identity verification at ID.me

4

ID.me redirects the user back to PingOne with an authorization code

5

PingOne exchanges the code for tokens

6

PingOne redirects the user to the target application with the final ID token

Sequence diagram showing the 9-step authentication flow between a User, Target Application, PingOne, and ID.me: the user visits the app, is redirected to PingOne, selects "Sign in with ID.me," authenticates with ID.me, which returns an authorization code to PingOne, PingOne exchanges it for an ID token, validates the token and claims, issues a PingOne token to the Target Application, and the user is signed in.

Prerequisites

  • Active PingOne customer solution environment
  • Access to PingOne with administrative permissions to manage identity providers, authentication policies, and application configurations
  • An ID.me sandbox account for testing your integration
  • Understanding of OIDC flows and terminology
  • An application to test the sign-in flow

Environments

ID.me provides two environments:

Sandbox

api.idmelabs.com

Production

api.id.me

All ID.me OIDC and SAML endpoints are derived from the base URL above. For production, replace the sandbox base URL in every ID.me endpoint you configure.

Examples

  • OIDC issuer (Sandbox): https://api.idmelabs.com/oidc
  • OIDC issuer (Production): https://api.id.me/oidc
  • SAML metadata URL (Sandbox): https://api.idmelabs.com/saml/metadata
  • SAML metadata URL (Production): https://api.id.me/saml/metadata

Configure PingOne

Configure ID.me as an OIDC External IdP

1

In the left-hand column, go to Integrations > External IdPs

2

Select the blue plus sign to add a provider

Select the blue plus sign to add a provider

3

Under the Custom section on the right, choose OIDC and select Next

4

Enter a Name such as ID.me and optionally add a Description

5

Set Population to Default (or the designated population for ID.me users)

6

Add the Sign in with ID.me button by selecting Upload Custom Image and uploading the ID.me logo

You would not use this button to test the flow in this guide, but it is good practice to add this when possible for future use cases.

7

Configure the connection using the Client ID and Client Secret provided by your ID.me Solution Consultant

FieldValue
Client IDThe Client ID provided by your ID.me Solution Consultant
Client SecretThe Client Secret provided by your ID.me Solution Consultant
Discovery Endpointhttps://api.idmelabs.com/oidc/.well-known/openid-configuration
Issuerhttps://api.idmelabs.com/oidc
Scopesopenid

Screenshot of step 3 of 4 in PingOne's "Add Identity Provider: Custom OpenID Connect" wizard, showing the Configure Connection form filled out with a Client ID, masked Client Secret, and ID.me Labs OIDC endpoints for discovery, authorization, token, and user info. Token authentication is set to Client Secret Basic, scope is "openid," and PKCE is disabled.

8

Select Next

9

On the Map Attributes page, select Add and map the following attributes:

  • Email Address: providerAttributes.email
  • Family Name: providerAttributes.lname
  • Given Name: providerAttributes.fname

Screenshot of the "Edit Attribute Mapping" dialog in PingOne for an ID.me External IDP, showing four mapped attributes — Username, Email Address, Family Name, and Given Name — each mapped to the corresponding ID.me providerAttributes field, all with Update Condition set to "Empty Only."

10

Select Save

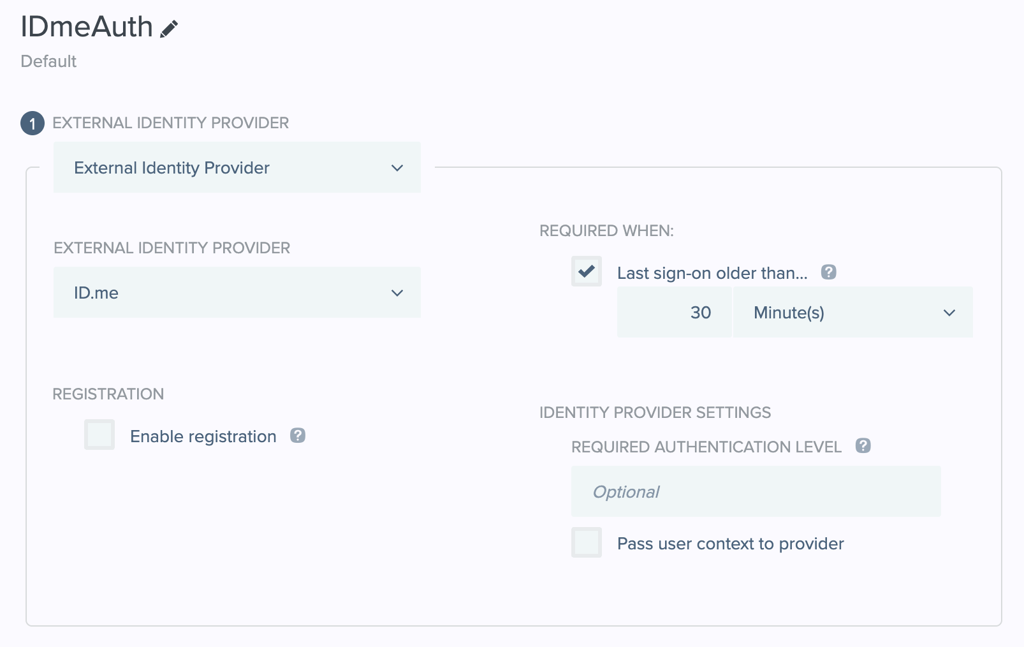
Configure authentication policies

1

Navigate to Authentication > Policies > Authentication

2

Select Add Policy

Screenshot of the Authentication Policies page header in PingOne, showing a search bar and an "Add Policy" button.

3

Enter IDmeAuth for the Policy Name

4

Select External Identity Provider for the Step Type

5

Select ID.me for the External Identity Provider

6

Select Save

7

Select Add Policy again to create a verification policy

8

Enter IDmeVerification for the Policy Name

9

Select External Identity Provider for the Step Type

10

Select ID.me for the External Identity Provider

11

Input the Required Authentication Level to the proper AuthnContext (e.g., ial2)

12

Select Save

Define the RP/SP configurations within your application

1

Navigate to Applications > Applications > [Desired Application] > Policies

2

Select the Edit icon

Screenshot of the Policies tab for the "Getting Started Application" in PingOne, showing two assigned PingOne Policies — IDmeAuth and IDmeVerification. To add or change policies, click the edit icon (white pencil in a blue circle) in the top-right of the image.

3

Select DaVinci Policies

4

Select the PingOne Policies tab

5

Select Deselect all other Policies

6

Check the boxes for both IDmeAuth and IDmeVerification

7

Select Save

Configure ID.me

This portion of the configuration is completed by an ID.me Solution Consultant. You will need to provide the following information to complete the setup:

Redirect URIs

The Redirect URI for your PingOne External Identity Provider. This is typically generated by PingOne after creating the provider.

Policy handle name

Confirm the ID.me policy handle (e.g., ial2 or teacher).

Test the integration

You can test the integration by constructing an authorization URL with the appropriate ACR values to signal required assurance levels.

Authentication at the front door

1

Update the following placeholders in the URL template below:

  • AUDIENCE_ID: Your PingOne environment ID
  • CLIENT_ID: Your PingOne Application Client ID
  • REDIRECT_URI: Your Application Redirect URI
Example
https://auth.pingone.com/AUDIENCE_ID/as/authorize?client_id=CLIENT_ID&redirect_uri=REDIRECT_URI&scope=openid&response_type=code&acr_values=IDmeAuth
2

Paste the modified URL into your browser

3

Verify you are redirected to the ID.me sign-in page

Step-up authentication or verification

1

Update the following placeholders in the URL template below:

  • AUDIENCE_ID: Your PingOne environment ID
  • CLIENT_ID: Your PingOne Application Client ID
  • REDIRECT_URI: Your Application Redirect URI
Example
https://auth.pingone.com/AUDIENCE\_ID/as/authorize?client\_id=CLIENT\_ID\&redirect\_uri=REDIRECT\_URI\&scope=openid\&response\_type=code\&acr\_values=IDmeVerification](https://auth.pingone.com/AUDIENCE_ID/as/authorize?client_id=CLIENT_ID\&redirect_uri=REDIRECT_URI\&scope=openid\&response_type=code\&acr_values=IDmeVerification)
2

Paste the modified URL into your browser

3

Verify you are redirected to the ID.me verification flow