

PingFederate OIDC integration guide
Overview
This guide provides steps to integrate PingFederate with IDMe using the OpenID Connect (OIDC) protocol.
Intended audience
Developers and IAM administrators responsible for configuring federation between PingFederate and IDMe.
What you will build
A federated authentication flow where PingFederate delegates user authentication to IDMe and issues its own ID token to a target application.
Result
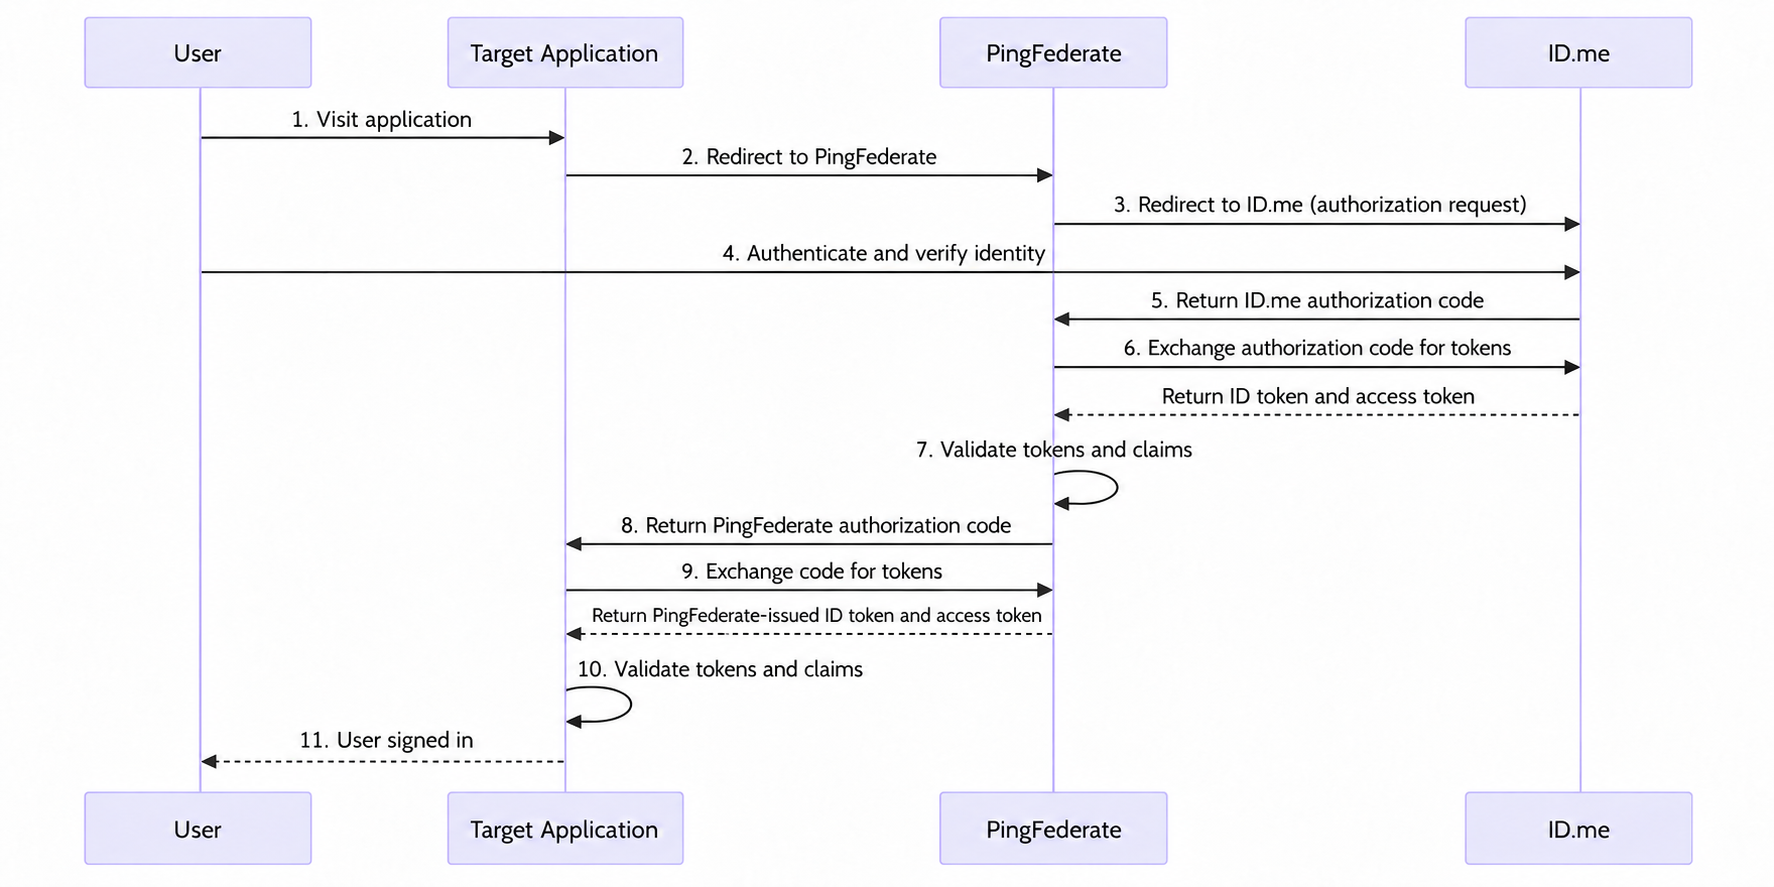
Users sign in through a target application, are redirected through PingFederate to IDMe to authenticate and complete identity verification, and return to the target application with a PingFederate-issued ID token containing the mapped IDMe attributes.
Identity proofing behavior
Authentication behavior, identity verification settings, and returned attributes are driven by IDMe policy configurations.
Authentication flow
The following steps outline the OIDC authentication flow between the user, the target application, PingFederate, and IDMe:
Prerequisites
- Active PingFederate instance
- Access to PingFederate (and optional user directory) with administrator access
- An IDMe sandbox account for testing your integration
- Understanding of OIDC flows and terminology
- An application to test the sign-in flow
- A directory such as PingDirectory, Active Directory, or OpenLDAP, and administrator credentials to configure it, if you plan to enable JIT provisioning (optional)
Environments
IDMe provides two environments:
All IDMe OIDC and SAML endpoints are derived from the base URL above. For production, replace the sandbox base URL in every IDMe endpoint you configure.
Examples
- OIDC issuer (Sandbox):
https://api.idmelabs.com/oidc - OIDC issuer (Production):
https://api.id.me/oidc - SAML metadata URL (Sandbox):
https://api.idmelabs.com/saml/metadata - SAML metadata URL (Production):
https://api.id.me/saml/metadata
Configure PingFederate
PingFederate plays two roles in this integration: an OIDC relying party to IDMe, and an OpenID provider to your target application.
As configured in this guide, this is a pass-through integration. PingFederate reads the attributes from IDMe’s ID token, maps them, and puts them in its own ID token for the application without saving them. No user directory is needed, and the steps through registering your OAuth client are the complete integration. A directory is needed only if you want PingFederate to create, and keep updated, a user account for each IDMe user, which is covered as an optional final step.
These steps were validated against PingFederate 13.1.2. Admin console menu paths may differ in other versions; check the PingFederate documentation for the latest information.
Create an authentication policy contract
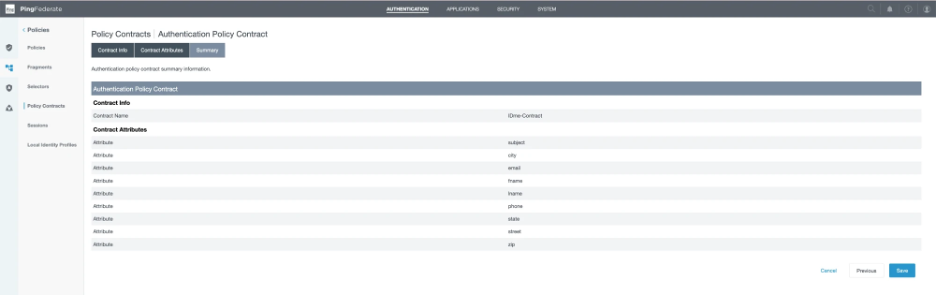
An Authentication Policy Contract is the common language in PingFederate between an authentication source (the IDMe IdP connection) and what consumes it (OAuth/OIDC token issuance). Without one, the attributes IDMe returns have nowhere to land.
On the Contract Attributes tab, subject is included by default. Under Extend the Contract, add each IDMe attribute you plan to pass to the application. This example uses fname, lname, email, street, city, state, zip, and phone
It’s recommended to keep the attribute names the same across this integration - from PingFederate to IDMe to the target application. Every layer in PingFederate declares its own attribute list, and matching names at every layer makes mapping mistakes easier to spot.
Add IDMe as an OpenID Connect IdP connection
Navigate to Authentication > Integration > IdP Connections and select Create Connection
Before you start, check the PingFederate base URL at System > Server > Protocol Settings > Federation Info. PingFederate builds the redirect URI that IDMe needs from this value.
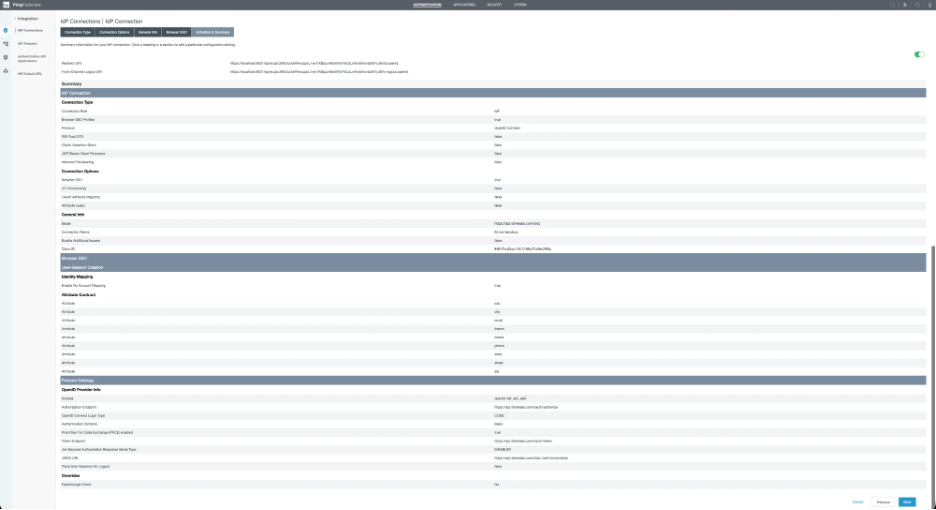
On the Connection Type tab, check Browser SSO Profiles, select OpenID Connect in the Protocol list, and select Next
On the Connection Options tab, leave Browser SSO checked, leave JIT Provisioning unchecked for a pass-through integration (check it only if you are also configuring the optional directory setup), leave OAuth Attribute Mapping unchecked since this guide maps attributes through the Authentication Policy Contract instead, and select Next
On the General Info tab, set Issuer to the IDMe sandbox issuer (https://api.idmelabs.com/oidc), select Load Metadata so PingFederate retrieves the endpoints from the IDMe well-known endpoint, enter a Connection Name (for example, ID.me Sandbox), and enter the Client ID and Client Secret from your IDMe Application, then select Next
On the User-Session Creation tab, select Configure User-Session Creation, then select No Mapping for Identity Mapping
The authentication policy you configure later maps IDMe’s attributes into the contract, so the connection does not need its own mapping. Account Mapping and Account Linking are for connections that map straight to a target session; Account Linking also ties each IDMe identity to an account the user already has in your existing user store, confirmed once by signing in with those existing credentials.
After you select No Mapping, the Target Session Mapping tab disappears; this is expected. Select Next. On the Attribute Contract tab, sub is the core attribute; under Extend the Contract, add each IDMe claim you need, spelled exactly as IDMe returns it (e.g., fname, lname, email, street, city, state, zip, phone), then select Next. On the Summary tab, review the settings and select Done, then select Next to go to Protocol Settings
On the Protocol Settings tab, select Configure Protocol Settings, then on the OpenID Provider Info tab confirm or set the following values:
The scope that IDMe receives is set here, in the Scopes field. This value decides what IDMe verifies and which attributes it returns, and PingFederate forwards it to IDMe unchanged on every sign-in. This is separate from the scope your target application later requests from PingFederate, which only controls which claims PingFederate includes in its own ID token.
Select Next. On the Overrides tab, leave the defaults and select Next. On the Summary tab (still under the Protocol Settings parent tab) select Done
Create an authentication policy
An Authentication Policy tells PingFederate which authentication source to use when an application sends a user to its authorization endpoint. Without one, PingFederate does not know to send users to IDMe.
An authentication policy decides how a user signs in, while a policy contract defines what data comes out when they succeed. Keeping them separate makes the contract a stable handoff point: you can add a second identity provider, place IDMe behind a selector, or add MFA after IDMe by changing only the policy, as long as each successful path still fills the same contract.
Check the IdP Authentication Policies box to turn on policies for browser-based sign-in, including the OAuth authorization code flow
Select Add Policy, enter a Name (for example, IDme-Sign-In), and for the first action select IdP Connections, then select your IdP connection name (for example, ID.me Sandbox)
For Fail, select Done. For Success, select your Authentication Policy Contract (for example, IDme-Contract)
Under the contract you selected, select Contract Mapping. On the Attribute Sources & User Lookup tab, leave it empty and select Next, since this tab is only for looking up extra attributes in a data store that do not come from IDMe
On the Contract Fulfillment tab, set Source to the IDMe IdP connection for every row, map subject to sub, and map every other attribute to the IDMe attribute with the same name, then select Next
You can also map subject to uuid, because the values are the same from IDMe and always included in payloads, but PingFederate defaults to the sub attribute, which may require fewer changes elsewhere in PingFederate.
On the Issuance Criteria tab, select Next. On the Summary tab, select Done to close the contract mapping, then select Done to close the policy
Make sure the policy is enabled in the top right of the screen, then select Save
If you already have policies, add the IDMe policy where it belongs in the existing order. PingFederate evaluates policies from the top down. To offer IDMe alongside another sign-in option, or to send some applications to IDMe and others elsewhere, put a selector (for example, Requested AuthN Context or OAuth Client Set) in front of the IDMe action.
For a single-IdP demo, you can skip the policy. Leave IdP Authentication Policies unchecked and add the IDMe connection on the Default Authentication Sources tab instead. In that case, the connection must map the contract itself: on the IdP connection’s User-Session Creation tab, select Account Mapping, and on Target Session Mapping select Map New Authentication Policy, select your contract, and map each attribute from Provider Claims. This is simpler but cannot grow to more than one sign-in option.
Configure OAuth and OIDC issuance
These OAuth objects turn the attributes in the Authentication Policy Contract into the ID token that PingFederate issues to the target application. The attributes flow as follows:
Each arrow above is a separate mapping screen in PingFederate. An attribute missing from any one of them is silently dropped from the ID token.
PingFederate also requires a persistent grant mapping, which identifies the user to the OAuth server; the attributes do not need to pass through it. Keep it to the user key and sub/uuid only, and never add personal data such as name, email, or address, because PingFederate stores the grant when it issues refresh tokens.
Define the scope and persistent grant attribute
Enter a Name matching your IDMe Policy handle (for example, nist_ial2_aal2) and a short, generic Description (for example, Access to ID.me-verified identity attributes)
Leave Dynamic Scope unchecked, since this guide uses one fixed scope name, and select Save
The scope description is static text that appears only on PingFederate’s own consent page, which this guide bypasses (see Bypass Approval Page when registering the OAuth client). It is not the IDMe consent screen: IDMe shows its own consent screen, built from the IDMe Policy, before it releases anything to PingFederate. Keep the description short and generic so it does not need updating when attributes change.
Under Persistent Grant Extended Attributes, add sub only, and select Save
This is PingFederate’s own name for the attribute, not IDMe’s claim. Its value comes from the contract’s subject, which can be filled from either IDMe’s sub or uuid, since they hold the same value. Keeping the name sub is recommended, since it carries through to the sub claim in PingFederate’s ID token, and OpenID Connect requires that claim to be called sub.
Create an access token manager
On the Type tab, enter an Instance Name and Instance ID (for example, idmeAtm), select Internally Managed Reference Tokens as the type, and select Next
On the Instance Configuration tab, this example uses a Token Lifetime of 120 minutes; keep the other defaults and select Next
On the Access Token Attribute Contract tab, leave Subject Attribute Name as USER_KEY. Under Extend the Contract, add sub and every attribute from your Authentication Policy Contract, selecting Add after each one, then select Next
Add sub to the access token manager’s attribute contract explicitly. If it is missing, the OpenID Connect Policy fails validation with “not an applicable token attribute” the next time anyone saves it.
Map the policy contract to the persistent grant
In the list, select your Authentication Policy Contract (for example, IDme-Contract) and select Add Mapping. If a mapping for that contract already exists, select it under Mappings instead
Create the access token mapping
In the Context list, select your Authentication Policy Contract (for example, IDme-Contract), not Default. In the Access Token Manager list, select your access token manager (for example, idmeAtm). Select Add Mapping. If a mapping for that context and access token manager already exists, select it under Mappings instead
On the Contract Fulfillment tab, map every access token manager attribute: set Source to Authentication Policy Contract, map sub from subject, and map each other attribute to the contract attribute with the same name, then select Next
On the Issuance Criteria tab, select Next. On the Summary tab, select Save
Every access token manager a client can use needs its own Access Token Mapping for this contract. If an OAuth client points at an access token manager that has no mapping, PingFederate fails at the first hit of /as/authorization.oauth2 with “There are no authentication methods available for OAuth,” before the user ever reaches IDMe. The access token manager does not have to be the tenant default.
Create the OpenID Connect policy
On the Manage Policy tab, enter a Policy ID and Name (for example, idmeOidcPolicy), select your access token manager under Access Token Manager, set ID Token Lifetime (this example uses 5 minutes), and check Include User Info in ID Token
Without Include User Info in ID Token checked, the ID token contains only sub, and the other attributes are available only from PingFederate’s UserInfo endpoint.
Select Next
On the Attribute Contract tab, extend it with the attributes you want in the ID token, then select Next
On the Attribute Scopes tab, map your scope (for example, nist_ial2_aal2) to the attributes it releases, then select Next
Each scope maps to the attributes it releases. For example, mapping nist_ial2_aal2 to release all eight IDMe attributes means that if the application requests only openid, the ID token contains only sub, even though the user still fully verified at IDMe.
Register the target application as an OAuth client
Now define an OAuth client in PingFederate that represents your application. Without one, PingFederate has no place to send the final ID token after validating IDMe’s response.
Configure the client: set Client ID (for example, my-web-app) and Name (for example, My Web App); set Client Authentication to Client Secret, select Generate Secret, and copy it for use in your target application’s OIDC configuration
Set Redirect URIs to the application’s callback (for example, https://app.example.com/callback), and set Allowed Grant Types to Authorization Code
Set Default Access Token Manager to your access token manager and check Restrict to Default Access Token Manager. Under OpenID Connect, set Policy to the OpenID Connect policy you created
Store IDMe users in a directory (optional)
Skip this step unless you want PingFederate to create, and keep updated, a user account in a directory for each IDMe user who logs in. Turning on Just-in-Time (JIT) provisioning does not change what the target application receives.
You may already have a directory behind PingFederate, typically PingDirectory or Active Directory, sometimes OpenLDAP or a SQL database. With JIT provisioning, PingFederate creates the user in that directory at the first IDMe sign-in and can update the account at every later sign-in. These steps were tested with OpenLDAP over LDAPS.
The certificate used in these example commands is for local setup purposes only. Use a trusted certificate from an official CA in production environments.
(LDAPS or StartTLS only) Set up the directory’s certificate and trust it in PingFederate. To create a test certificate on macOS for a local test directory, run the following commands in Terminal, replacing ldap.example.com with the hostname you enter in Hostname(s).
Create a test certificate authority (CA):
Create the directory’s private key and certificate request:
Sign the directory’s certificate with the CA:
Check the result, which should print “ldap.crt: OK”:
Configure the directory to use ldap.crt and ldap.key for LDAPS, then import ldap-ca.crt into PingFederate: navigate to Security > Certificate & Key Management > Trusted CAs, select Import, choose ldap-ca.crt (in PEM format), review the certificate on the Summary window, and select Save
Only PingFederate needs to trust ldap-ca.crt. You do not need to add it to the macOS Keychain, since PingFederate checks the directory’s certificate against its own Trusted CAs list and its Java runtime, not the operating system’s trust store. Importing certificates into PingFederate requires an administrator account with the Crypto Admin role.
Keep ldap-ca.key private, since anyone with it can create certificates that PingFederate will trust. For production, use a certificate from your organization’s CA instead; if that CA is already trusted by PingFederate’s Java runtime, you do not need to import it.
Connect PingFederate to the directory: navigate to System > Data & Credential Stores > Data Stores and select Add New Data Store. On the Data Store Type tab, select Directory (LDAP) and select Next
On the LDAP Configuration tab, configure the following: Hostname(s) with the directory’s host and port (for example, ldap.example.com:636 for LDAPS); Connection Security set to LDAPS or StartTLS (choose None only for a local test directory, and ensure the hostname matches the certificate); leave Use DNS SRV Record and Follow LDAP Referrals unchecked; LDAP Type set to PingDirectory, Active Directory, or Generic for OpenLDAP; Authentication Method set to Simple; and Credential Storage set to Internally Managed.
For User DN and Password, use a dedicated service account that PingFederate signs in to the directory as; do not use the directory administrator account. Give the account permission to search, read, create, and modify user entries only under the base DN where JIT creates users (for example, ou=people,dc=example,dc=com). For OpenLDAP, create the service account and grant it those rights before this step:
Your database name ({1}mdb) and rule position ({1}) may differ; the rule must come before the directory’s general access rules. Enter cn=pf-jit,ou=service-accounts,dc=example,dc=com as the User DN, with the account’s password.
Select Test Connection to confirm PingFederate can reach the directory and sign in with that account, then select Next
On the Summary tab, review the settings and select Save. PingFederate names the data store after its hostname (for example, openldap)
Turn on JIT provisioning for the IDMe connection: navigate to Authentication > Integration > IdP Connections and select your IDMe connection (for example, ID.me Sandbox). On the Connection Options tab, check JIT Provisioning. Select Next through General Info and Browser SSO, which are already configured, to the JIT Provisioning tab, then select Configure JIT Provisioning
On the User Repository tab, under Active Data Store, select the data store you created (listed by its hostname, for example, openldap), then select Next
On the Location tab, enter the Base DN where users are created (for example, ou=people,dc=example,dc=com), then select Next
On the Unique User ID tab, in Filter, enter uid=${sub} without parentheses, so IDMe’s sub is the user key, then select Next
On the Attributes tab, for each directory attribute select its Root Object Class, then the attribute, and select Add Attribute. This example uses inetOrgPerson for uid, givenName, and mail; organizationalPerson for street, l, st, postalCode, and telephoneNumber; person for sn and cn; and top for objectClass, which every new directory entry needs. Select Next
Added attributes are listed alphabetically, not at the bottom, so look for each one in its sorted position (for example, objectClass appears between mail and postalCode). Use Add Attribute for each row; Save saves the whole connection, not the row you are building.
On the Attribute Fulfillment tab, map each directory attribute from Provider Claims: uid from sub, givenName from fname, sn from lname, cn and mail from email, street from street, l from city, st from state, postalCode from zip, telephoneNumber from phone, and objectClass set to inetOrgPerson as Text. Match these to your directory schema, then select Next
On the Event Trigger tab, select All Claims, so PingFederate creates the account at the first sign-in and updates it with the latest IDMe attributes at every sign-in, then select Next
The default, Only Claims Containing a New User ID, creates the account once and never updates it. Use it only if other systems maintain those directory attributes after the account is created.
Configure IDMe
This portion of the configuration is completed by an IDMe Solution Consultant. You will need to provide the following information to complete the setup:
Redirect URIs
The PingFederate redirect URI, copied from the IDMe IdP connection’s Activation & Summary tab, must be added to your IDMe Application’s allowed redirect URIs.
If you enable PKCE on the IDMe Application, PingFederate’s Enable PKCE setting on the IdP connection’s OpenID Provider Info must match.
Policy handle name
Confirm the IDMe policy handle (for example, nist_ial2_aal2). This value must match the Scopes value on the PingFederate IdP connection, together with openid, and determines the identity verification level and attributes IDMe returns.
Test the integration
There are two ways to test the integration.
Option 1: Sign in through the target application
Start the target application and select its sign-in button. The application sends you to PingFederate’s authorization endpoint
PingFederate redirects you to IDMe. Complete authentication and identity verification according to your IDMe Policy settings
The application exchanges the code at PingFederate’s token endpoint and receives a PingFederate-issued ID token. Its iss value is your PingFederate base URL, not IDMe
If you configured JIT provisioning, also confirm that PingFederate created the user in your directory, for example by running ldapsearch filtered on uid=<the IDMe sub>. The ID token the application receives is the same with or without JIT provisioning.
Option 2: Manually construct the authorization URL
Use this format:
For example:
Before you sign in, export PingFederate’s runtime certificate so curl can verify the connection to the token endpoint: navigate to Security > Certificate & Key Management > SSL Server Certificates, select Action > Export for the certificate PingFederate uses for its runtime (port 9031), keep Certificate Only selected, and select Export. Save the file as pf-runtime.pem. Do not use curl -k instead, since it skips certificate checks and would send your client secret to any server.
Paste the URL into a browser on one line, without line breaks. Complete IDMe sign-in; the browser lands on the redirect URI with a code parameter. (If the application is not running, the page fails to load, but the code is still in the address bar.) Within 60 seconds, exchange the code:
Decode the id_token in the response and check the claims.
Troubleshooting
After authenticating at IDMe, PingFederate shows an error or no attributes come through
Check that the IDMe Policy handle matches the handle in the IdP connection’s Scopes field. A mismatch is the most common cause of failures on the IDMe leg.
error=server_error&error_description=There are no authentication methods available for OAuth
This error appears at the first hit